.avif)
Level Up Your Asset Management With Unity Addressables
If you’re a bit familiar with the world of game creation, you probably already know by now that games are not just about code. Writing scripts is essential to giving life to your character and your environments, but you still need visuals, and data to populate your scenes! In other words, asset management is just as crucial as coding if you plan on making a complex multimedia project like a game.
And, if you’re somewhat used to Unity, you might be thinking that all those core assets that are shown in the final game have to be put in the Resources/ folder - after all, that’s where you can easily load data from at runtime, and these are the files that will be copied into your build, and thus be available in the production version of the game.
But did you know that, ever since 2019, there’s actually been an amazing alternative to this Resources/ folder for asset management, called the Addressable Asset System?
Today, let’s discuss the perks of this tool, and see how it can facilitate asset management for large projects :)
Exploring the Unity Addressables
A quick overview
First of all, we need to understand what Addressables are exactly - and, in particular, what are the differences with the usual “quick-and-dirty” techniques for importing data and assets in your game (direct references, using the Resources/ folder or creating basic asset bundles).
There are two big ones:
- First, the Addressable Asset System relies, as the name implies, on addresses. This means that, as soon as you mark an asset in your game as “Addressable”, it will be given its own unique address that you can reference inside your game code, and that the system will be able to analyse to locate and retrieve the actual data.
The important thing to note is that this address can be local or remote - meaning that, with Addressables, you can very easily prototype your game with all the resources stored on your computer locally, and then, for production, extract those assets to a remote asset management system ;) - Second, the Addressables are loaded asynchronously. This makes for faster and more dynamic games, and it also goes hand-in-hand with the “local or remote” storage - since downloading data from a remote source can hardly be done synchronously without freezing the entire game for the player!
The main advantages of this system
The Addressable Asset System is therefore a great tool for organising and managing game assets, be them 3D models, images, audio files or simple data text files.
Because you can toggle on and off the “Addressable” property of a file at any time, you can group your files into local or remote packages and you can drag an asset from one group to the other whenever you want, this system is extremely flexible. Its API for loading and releasing assets at runtime allows you to write your data loading code once, and then play around with your files (or your files’ location) without having to update the scripts.
Moreover, the Addressables auto-handle dependencies; so if we request the loading of a mesh for example, the system will make sure to first prepare all the required shaders and materials to finally give us back the fully loaded object. This is a game-changer compared to the previous techniques, because this lets us define high-level “entry points” to our data (like the player’s avatar, the environment for Level 1, etc.) and then have Unity compute all the related resources to send us back a proper chunk of data.
(Note that, because the system has this nice understanding of the dependencies between your assets, it can also create more efficient and better-organised asset bundles than with the usual AssetBundles package. The Addressable Asset System actually builds on this AssetBundles package, but it’s easier to use because it abstracts away a lot of the loading/unloading steps.)
Finally, the Addressables have their own reference count system - so they can quickly tell you in the Unity Profiler window if there is some memory leak somewhere, and help you track down any asset-related memory issue you may have in your project.
Studying a basic example
To better understand how this tool works, and how we can set it up, let’s detail the steps to installing, configuring and using Addressables in a demo Unity game project.
Our goal will be to auto-set the sprite of a basic Unity UI image thanks to Addressables.
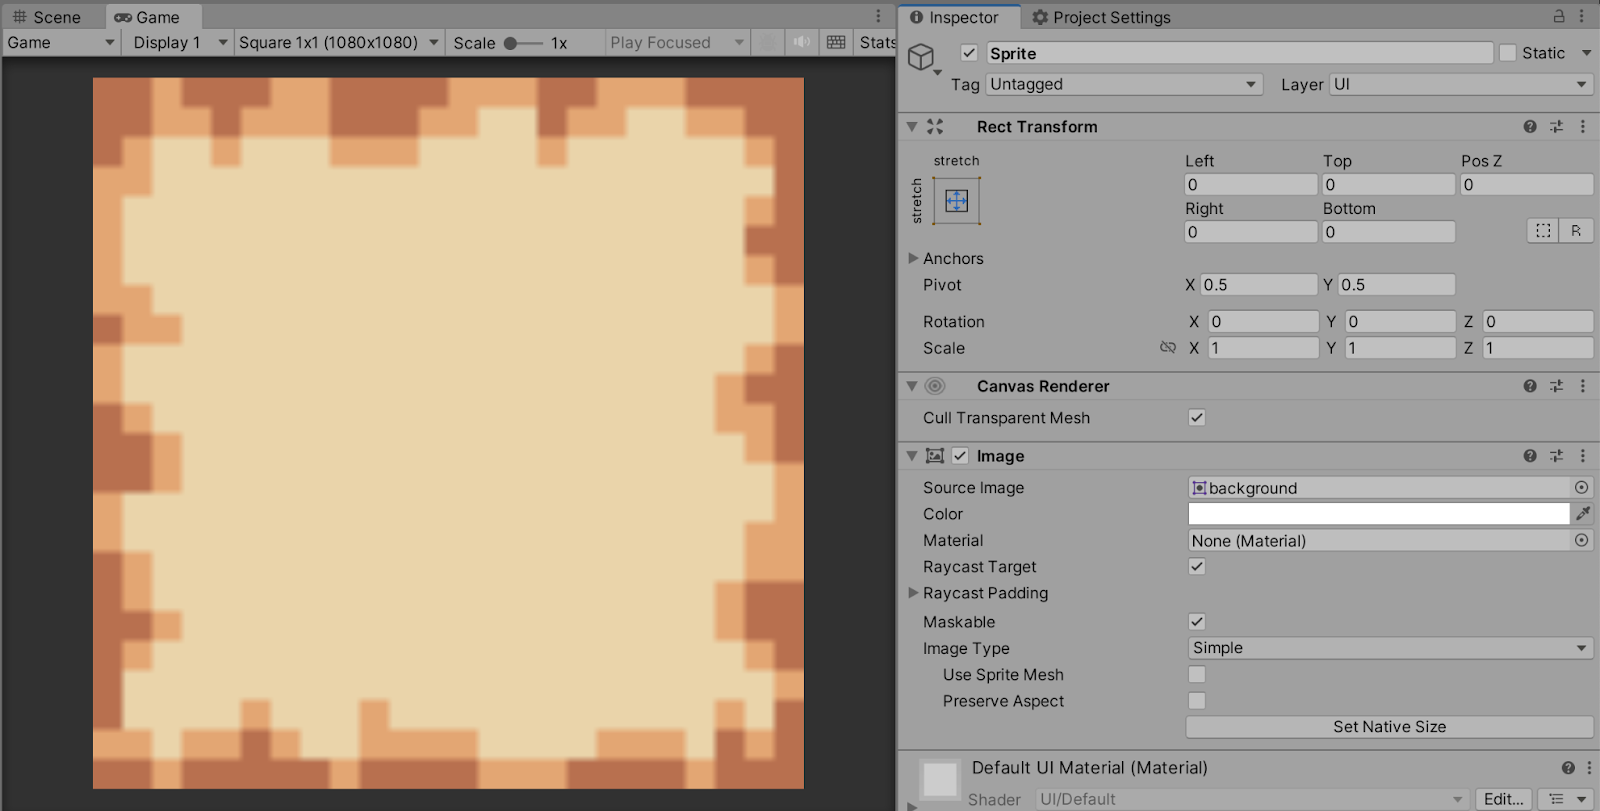
Our example scene will just contain a “Canvas” object with one called “Sprite” underneath, and an empty game object called “LOADER” to actually run our logic. The “Sprite” will have an Image component, but it won’t have any real image defined, so it will be blank in edit mode:
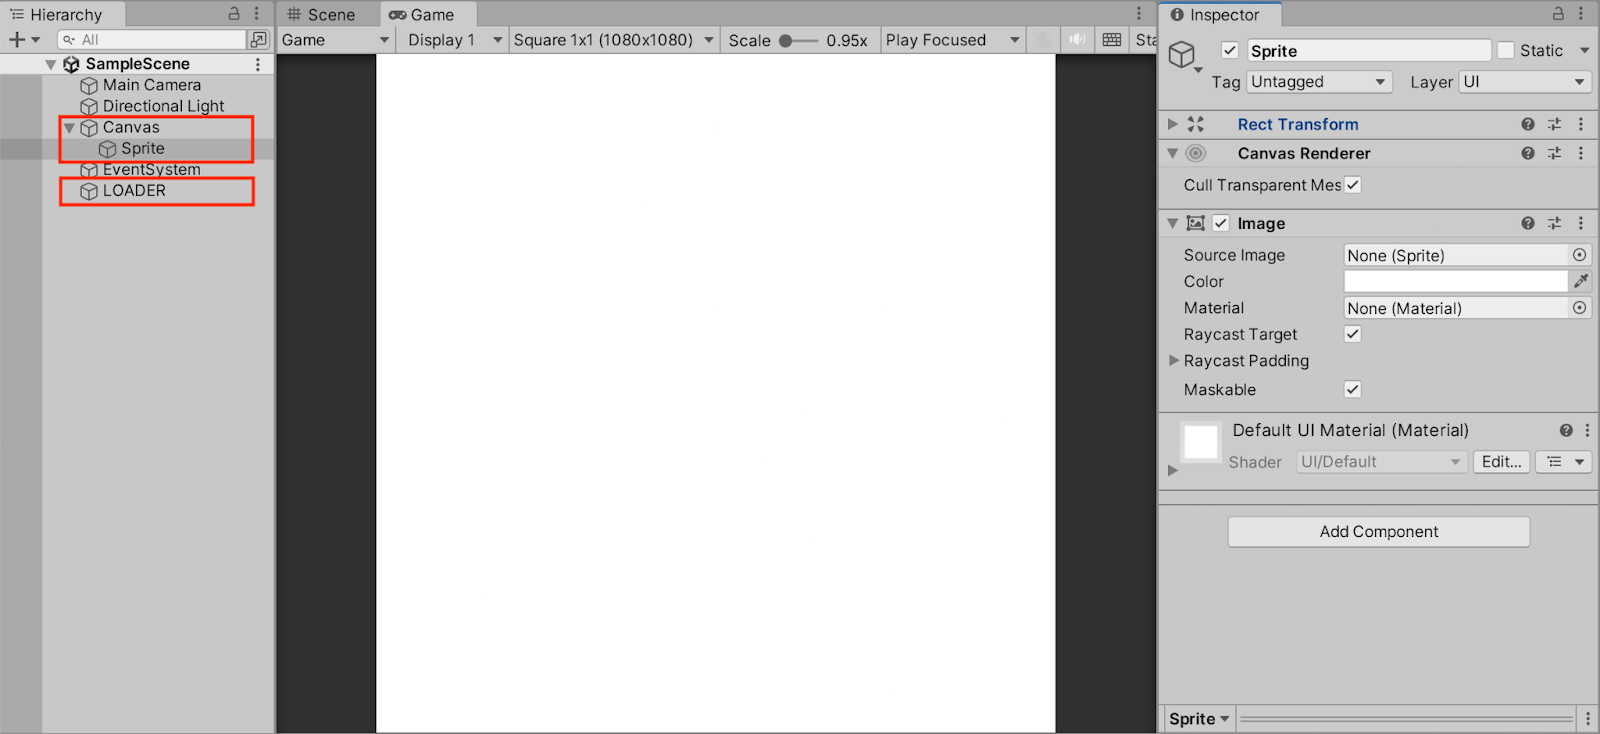
And, by the end of this section, we’ll have taken advantage of our Addressables to set this image from a reference sprite asset in our project.
So let’s see how to do this step-by-step :)
Installing & setting up the package
First of all, to be able to use Addressables, we need to actually install the Unity package because, for now, it is not yet integrated in new projects.
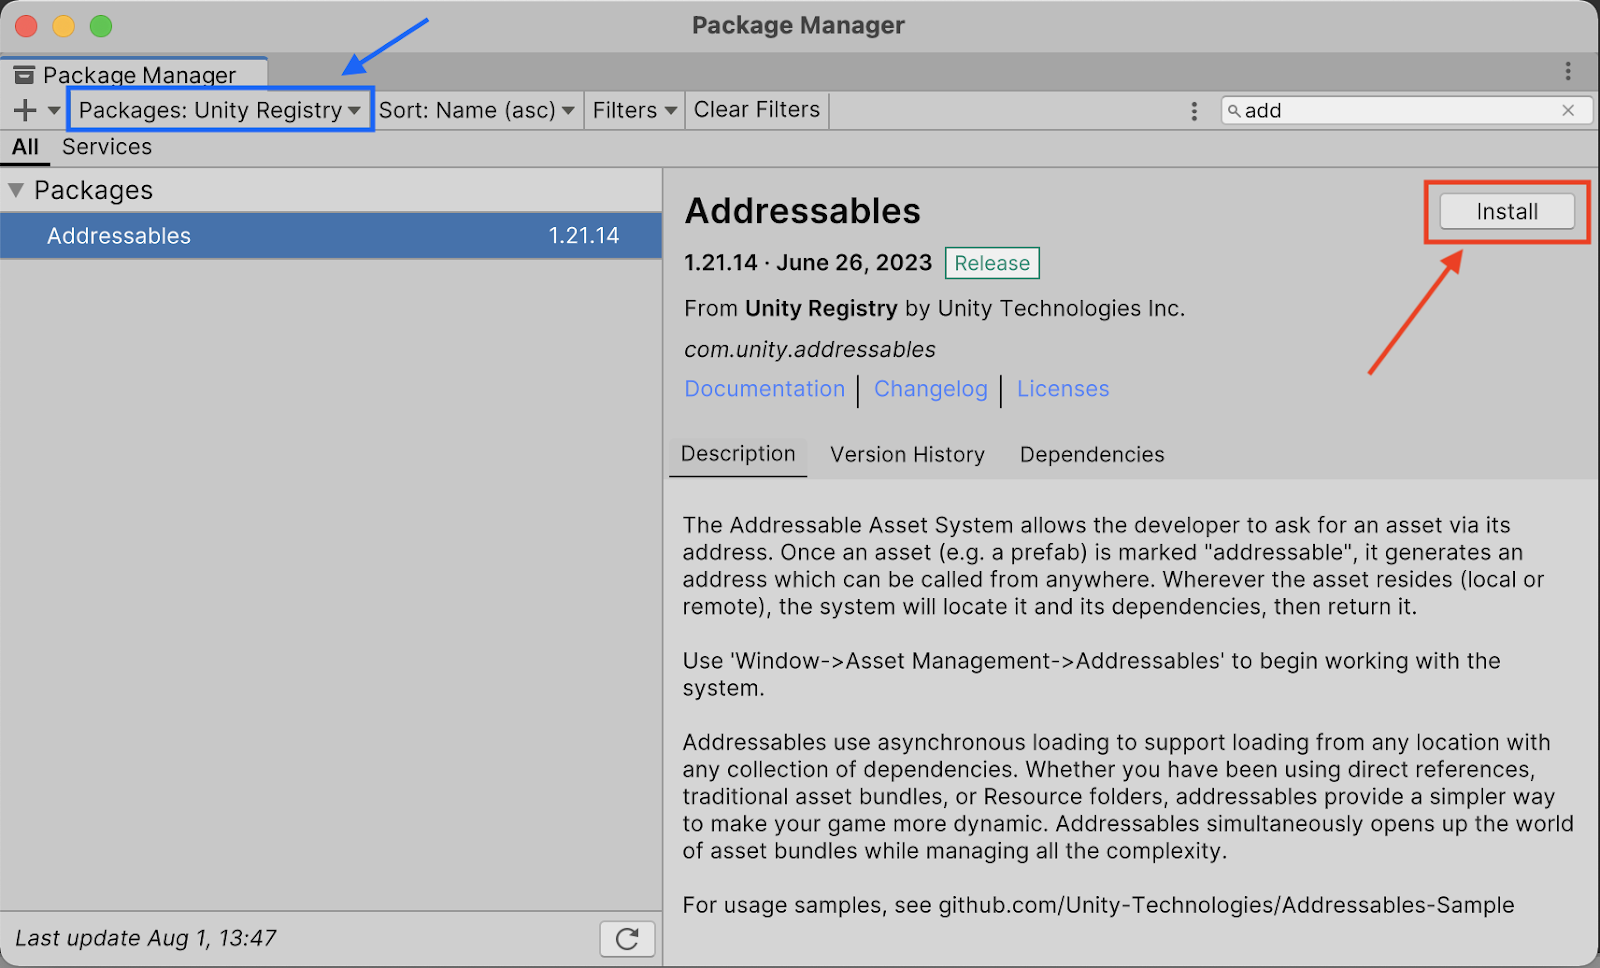
Let’s open the Package Manager window, make sure we’re in the Unity Registry search mode, and look for our package. If you click on the Addressables item in the list on the left, you’ll see details on the package, and you’ll get an Install button that you can click to add it to your project:
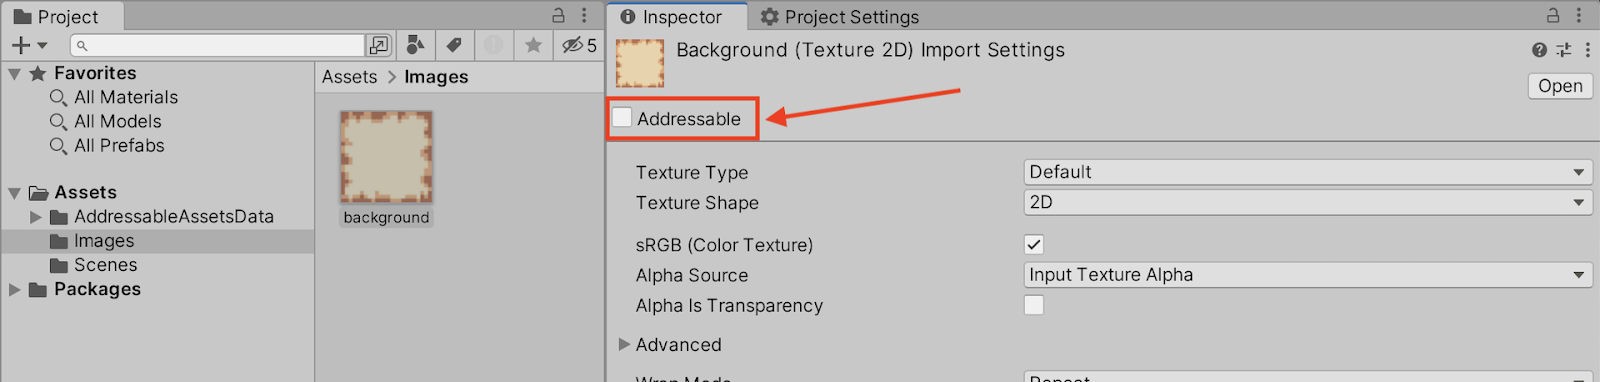
Once it’s installed, you’ll notice that whenever you select an asset in your Project dock, the Inspector panel will show you a little Addressable toggle to add or remove this asset from the system:
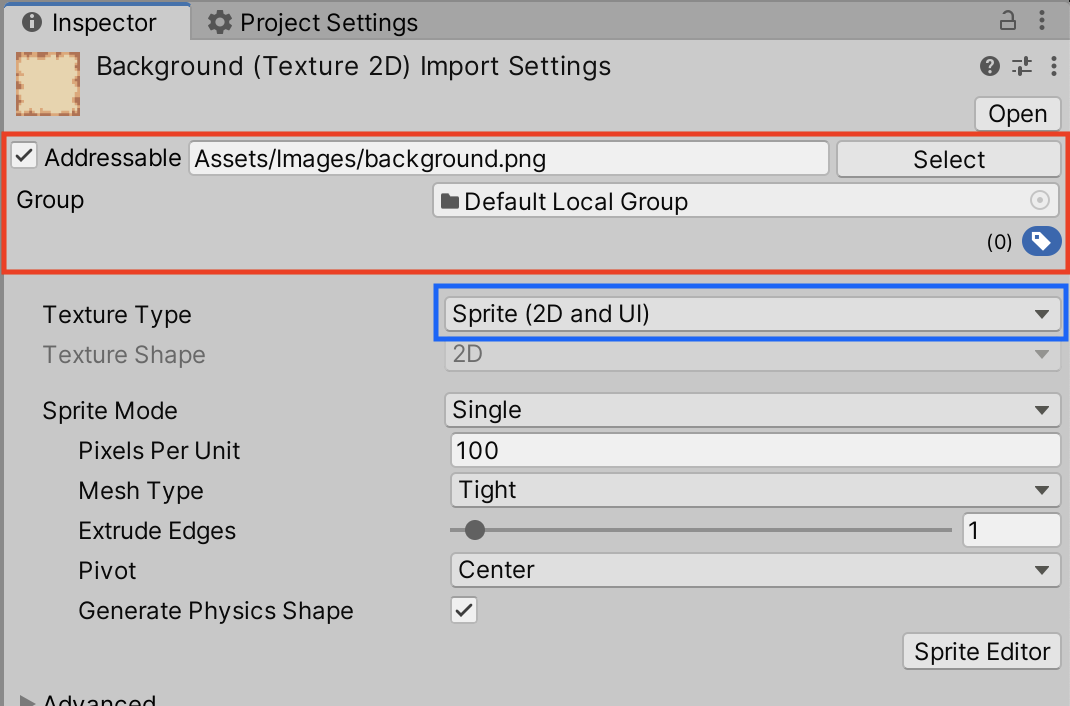
As soon as you click it, Unity will auto-compute a unique address for your asset based on its location in your project’s tree. Also, while I’m at it, I’ll also ensure that my image is a sprite by changing its Texture Type. So in the end, here’s the top of the Inspector of my background.png image asset:
Everything’s now ready for using our asset using the Addressables API at runtime, from our C# scripts.
Using the Addressables API to load and release assets
To actually load up our background.png image file when the game starts, and assign it to our “Sprite” object’s Image component, we’re going to need to create a C# script. Let’s call it SpriteLoader.cs and put it on our empty “LOADER” game object.
Inside this script, we’ll code something similar to the example script in the official docs of the Addressables package and do the following:
- First, we’ll import the UnityEngine.AddressableAssets and the UnityEngine.ResourceManagement.AsyncOperations package.
- Then, we’ll create two public variables to show in the Inspector: a reference to the Image component to assign the sprite asset in, and the address of our background.png image asset in the Addressables system.
- Then, we’ll use the Addressables.LoadAssetAsync() function to begin the asset load when the game starts, and we’ll create a callback function to run when this load is completed.
- Finally, we’ll make sure to release our handle on the loaded asset when the game ends, by adding some clean-up logic in the OnDestroy() function of our class.
All this gives us the following script:
using UnityEngine;
using UnityEngine.AddressableAssets;
using UnityEngine.ResourceManagement.AsyncOperations;
public class SpriteLoader : MonoBehaviour {
public UnityEngine.UI.Image spriteImage;
public string spriteAddress;
private AsyncOperationHandle<Sprite> _handle;
void Start() {
_handle = Addressables.LoadAssetAsync<Sprite>(spriteAddress);
_handle.Completed += _OnLoadCompleted;
}
private void _OnLoadCompleted(AsyncOperationHandle<Sprite> operation) {
if (operation.Status == AsyncOperationStatus.Succeeded)
spriteImage.sprite = operation.Result;
else
Debug.LogError($"Asset '{spriteAddress}' failed to load.");
}
private void OnDestroy() {
Addressables.Release(_handle);
}
}
You see that most of the “special stuff” happens in the callback function of our load request, _OnLoadCompleted(). In this method, we actually access the asynchronous operation wrapping manager, the operation variable of type AsyncOperationHandle<Sprite>, and we retrieve its result if everything went well. Else, we show an error in the console to help understand what caused the crash.
You’ll notice that we actually have to specify the type of asset we’re going to retrieve thanks to the specific type of the AsyncOperationHandle generic type instance, and that we can check the status of the asynchronous operation against some predefined values like AsyncOperationStatus.Succeeded.
All we have to do now is assign the Image component and the address in the Inspector:
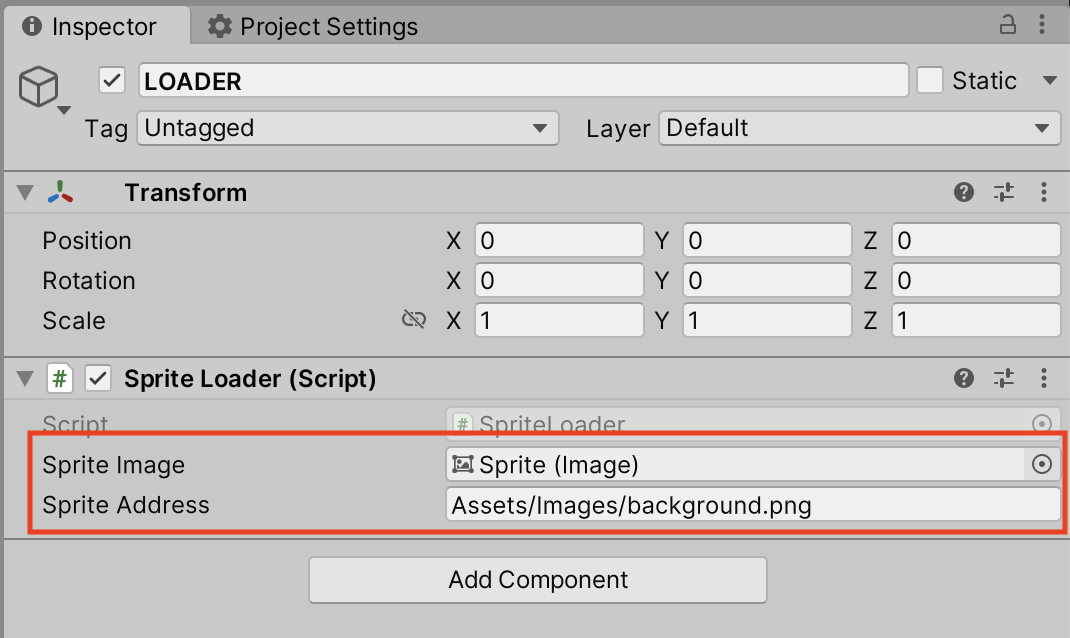
And we’re all set for running the scene… and we see our “Sprite” object is automatically assigned our background.png image asset as its image when the game starts!
With this little example, we see that the Addressable Asset System is really nice because we can quite easily get our data and use it in our game at runtime. However, the tool is not perfect for all situations, and there are still a few things to consider before taking the plunge and shaping your whole data management architecture around it :)
Going remote?
As we said before, one of the big powers of Addressables is that they allow you to easily go from local to remote assets without having to rewrite all of your codebase. This is possible because the system is able to reconstruct unique URLs and thus offer us the same API in both cases.
That being said, turning your local assets into a pack of remote files needs a bit of configuration work. Most notably, you’ll need to enable some global Addressable settings and build a catalogue of resources.
So let’s say we continue our demo from before and turn our content into remote assets. The steps are essentially the following:
- First, we need to tell the Addressable Asset System we want to use remote assets. To do this, we need to go to the Window | Asset Management | Addressables | Settings window and enable the Build Remote Catalog option. Also, make sure to set the Build & Load Paths to remote.

You’ll notice that, below these options, we get a new label indicating our BuildPath: this is the location where the catalogue and metadata of our files will be hosted.
- Then, we need to decide which assets will be hosted remotely. To do this, let’s start by open our Addressable groups list (by clicking on the Manage Groups button at the top of this Inspector, or by going to the Window | Asset Management | Addressables | Groups menu).
Here, we should make sure that we’re not modifying the Default Local Group directly - ‘cause, as the name implies, it should remain local ;)
Rather, we’ll create a new group by right-clicking in the panel, rename it to something more personal, and drag-and-drop our background.png Addressable asset to this new group:
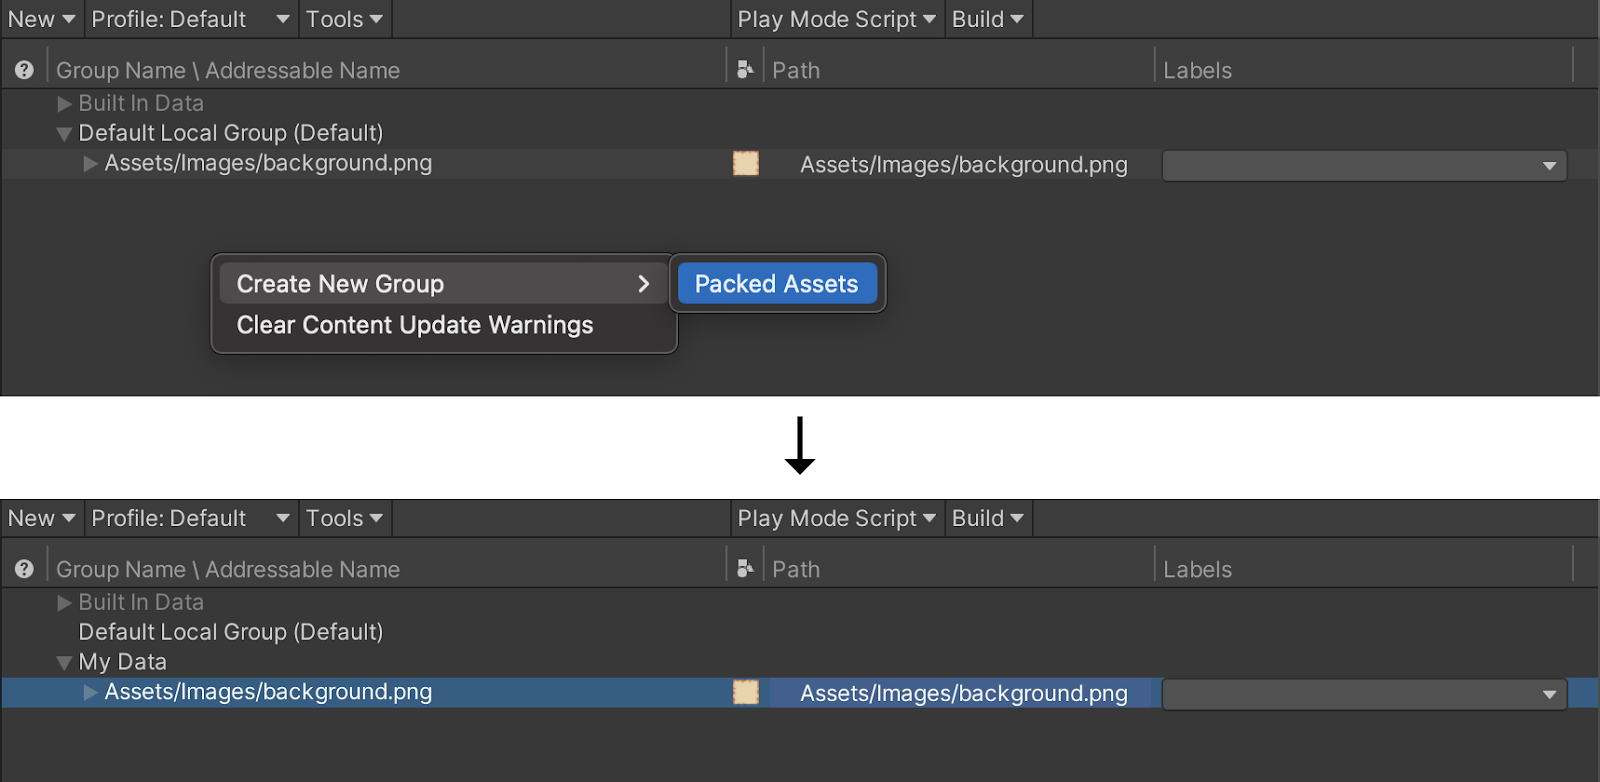
Now, if we look in our Project dock and go to the AddressableAssetsData | AddressablesGroup folder, we see that a new asset called “MyData” was created with the info of our group.
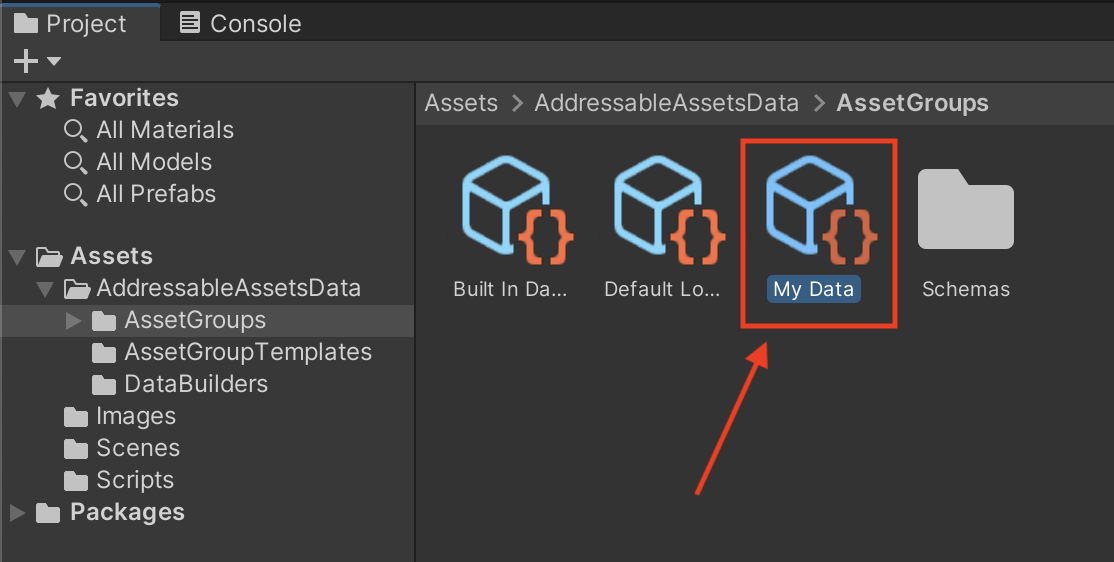
We can select it to show its Inspector, and turn its Build & Load Paths option to Remote:
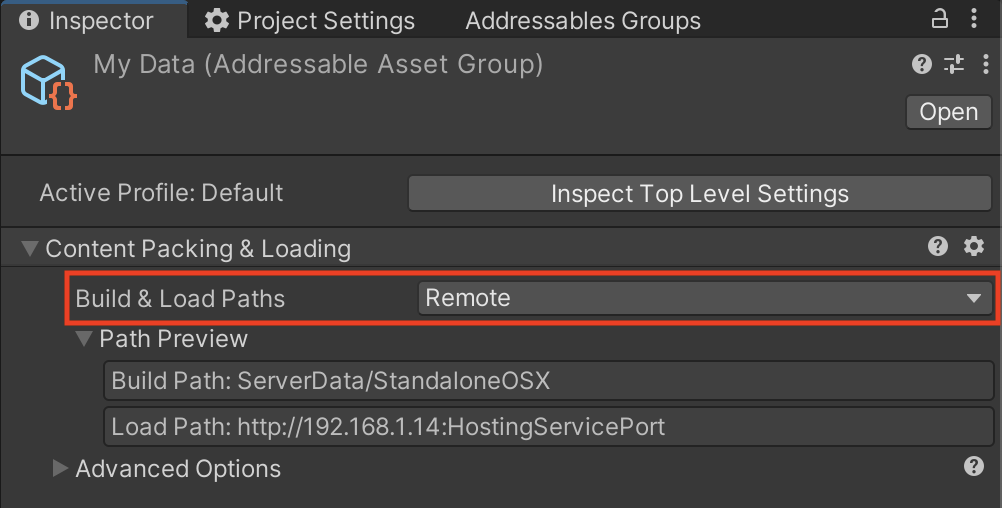
- At this point, the funny thing is that we can still run our demo, and the image gets loaded. So, is it remote or not?
Well, not quite. The last thing is to choose the Profile of our Addressable group. For now, we’re using the Default Profile (as you can see at the top of the screenshot above, in the Inspector panel of our asset “My Data”. And this Profile actually uses a sort of “in-between” dev-friendly remote system, that is hosted by the Unity Editor itself. So, from our point of view, nothing has really changed.
To really make our assets remote, we would need to:
- Go to the Window | Asset Management | Addressables | Profiles panel.
- Create a new Profile, for example named “My Profile”.
- Sets its Remote option to either Cloud Content Delivery (CCD) or Custom. Basically, CCD is a Unity solution to store, version and manage assets remotely which is available as a pay-as-you-go service; and the Custom option allows you to specify your own server where the assets are hosted.
I won’t go into the details of using CCD or setting up a custom server here, but be sure to check out the official documentation of the package to learn more about remote asset serving, and in particular the asset hosting services, over here :)
A few gotchas & limitations!
Additional complexity
Despite all their advantages (and in fact because of some…), Addressables are a bit more complex to use than plain old direct references or data loading via the Resources/ folder. Our demo was a very simple case, and yet we still had to install and configure a Unity package, and write a fairly long script compared to the final result.
Using Addressables requires some good habits from a variety of profiles in the game team:
- For the artists and integrators working on the asset files themselves, it is important to remember to toggle on the “Addressable” property on said files - and, if need be, to manage the different Addressable groups.
- For coders, you can’t just write some quick one-line resource load like before. For example, in our case where we want to load an image, the “old way” would have been to put our Images/ folder inside a Resources/ directory, and then simply implement this Start() function in our SpriteLoader class:
void Start() {
spriteImage.sprite = Resources.Load<Sprite>("Images/background.png");
}
But because the Addressable Asset System is asynchronous, when you use Addessables you at least need to import the UnityEngine.AddressableAssets and the UnityEngine.ResourceManagement.AsyncOperations packages, and then code up the load request and its asynchronous callback operation, as we saw before.
This means that the load/save parts of your codebase might grow quite a lot in size when you switch to this tool… and that going from the usual Resources/ folder-based technique to Addressables mid-project, while it is possible, requires a good amount of refactors.
If your project is just a prototype, or if it isn’t meant to really grow in size, then perhaps sticking with the plain ol’ direct references, or Resources/ folder-based data retrieving, is just fine ;)
Another thing worth pointing out about the Addressable Asset System is that, for all its great ideas and features, it doesn’t offer anything for versioning your assets.
Indeed, though you can easily “teleport” an asset from local to remote thanks to the address-based philosophy, and define groups or labels, and load everything in an optimised way using AsyncOperations, the Addressables don’t allow you to track the changes you made to your assets or keep a history of your previous versions.
Sure, because you can extract your assets to a remote location like a Google Drive, you can benefit from the versioning utilities of those external storage services, and then include the assets in your game via their remote address at runtime.
But, now, let’s say you’re a diligent game dev, and you follow the usual good practices of software development, and so you already have some solution to version your codebase.
Then you’d need to manage two versioning systems at all times, one for the scripts and one for the assets, and make sure that everything is always in sync (so that you don’t try to download and integrate an asset using an Addressable reference that doesn’t exist anymore, for example)!
Sounds like quite a hassle, right? Well, luckily, there are some ways around that :)
Versioning large Unity assets with adapted tools
The usual problem with common SCM solutions is that they can’t version large files well. Typically, one of the most famous versioning tools, Git, was initially designed with code and text files in mind - so whenever you have to deal with complex binary assets like images, movies or 3D models, it gets really difficult really fast.
Of course, over the years, other solutions have started to appear and grow in the game dev community. Most notably:
- PlasticSCM, which was bought by Unity a few years ago and has since been renamed Unity Version Control, is now the de-facto solution for a lot of medium- or large-sized Unity game teams. It handles large files well, and you can start quite quickly thanks to the cloud-based version… but you’ll soon be limited by the maximum storage and the pay-as-you-go model - with pretty steep prices. You can always set up your own server and use the tool on-prem, but then you’ll need to manage this server yourself!
Similarly, Perforce also relies on the cloud and a remote server for versioning, and it can manage big assets just as well.
Both those solutions are the big names that are gradually taking over the world of game dev SCM. But of course, they’re far from being the only ones, and other initiatives are working on how to make the daily lives of game creators easier - in terms of versioning, at like.
For example, Diversion is a cloud-native SCM solution that is especially meant for game development. It is currently in beta, but it already offers several interesting features, such as highly scalable versioning (to manage and keep a history of both plain text files and binary multimedia assets), and a user-friendly user interface to allow non-devs to participate in the project maintenance.
What’s interesting with those alternatives to the well-known Git is that, because you can keep all your codebase and assets together, you don’t have to take care of multiple version control systems anymore. Everything is neatly organised, tracked, and easy to compare.
So, if you mix this with Unity’s Addressables, you can start to design a pretty cool workflow, with centralised asset management, clever unique addresses, async loading and even additional DevOps tricks, like auto-deployed builds using CI/CD :)
Conclusion
Unity keeps on offering new features and, as time was going by, it gradually became one of the go-to game dev engines. A few years ago, it even improved its data loading features by integrating the Addressable Asset System - a package specifically dedicated to storing, retrieving and managing assets in an optimised and asynchronous way… and that can handle both local and remote storage!
That being said, this system has a fairly high barrier to entry that makes it a bit difficult for beginners, and a bit heavy for small or prototype game projects. Moreover, it doesn’t offer any tool for keeping track of the history of your assets - there is no versioning solution.
This question of asset management for games is essential, but it’s also complex, because games contain a wide variety of files - from the scripts which are plain text files to an image, a 3D model or an audio clip which is a binary resource.
That’s why some of the standard SCM solutions like Git can be a bit inefficient or cumbersome to use for game dev version control. Luckily, there are other alternatives that better support large files, such as Perforce, PlasticSCM, or Diversion. So if you’re curious about this alternative solution and you want to learn more, check out Diversion here!


