

How to handle Merge Conflicts in Unreal Engine 5
At some point in the development phase of a project will come a time when you have to deal with a merge conflict. Whether that is due to conflicting changes from your work when compared to your main branch or having to roll back some changes. Technology has developed in such a way to make the process of merging much less painful than it used to be by utilizing IDE plugins and GUI Git clients.
You might be wondering, if these tools exist then why am I writing this article? These tools work well for text-based files and not binary files. Unreal Engine poses a unique challenge where most of the files you will be working with in the engine are uasset files which are binary files instead of text files. Let’s dive a little deeper into uassets.
What are Uassets?
Uassets are the file type that is created for almost all engine assets. Textures, Data Tables, Blueprints and Materials are all saved as uassets which are binary files. Uassets can vary greatly in size from a couple of KB like the ThirdPersonCharacter blueprint to several GB 8k Textures used for high detail characters and static meshes. This poses a unique challenge when you are trying to merge two different versions of a uasset and a conflict is created. The same issue also arises if you want to compare multiple versions of the same file. So how do you handle those conflicts? Let’s walk through a common example.
Third Person Character Blueprint
For this example, we will be using the third person character blueprint and Perforce as a source control management(SCM) system. Don’t worry, I’ll go over some Git towards the end. If you want to follow along you can open up the engine, create a new project and select Third Person as the template. Once you have that created, open the ThirdPersonCharacter blueprint.
In this example we are going to add two simple changes across 2 different machines (in a real scenario they would be 2 different users) working off of the same branch. The first one will be opening up the Character Movement component that is attached to the blueprint and changing the Gravity Scale and Max Acceleration defaults. I changed the Gravity Scale from 1.75 to 1.5 and Max Acceleration from 1500 to 1700.
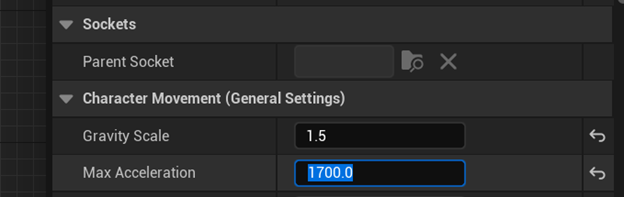
While it isn’t relevant for this guide, for you curious folks out there the Gravity Scale value controls the rate that your character falls at, the higher it is the denser your character will be and the lower it is the more they will float through the air while falling. The Max Acceleration value will dictate how fast your character will reach their max movement speed.
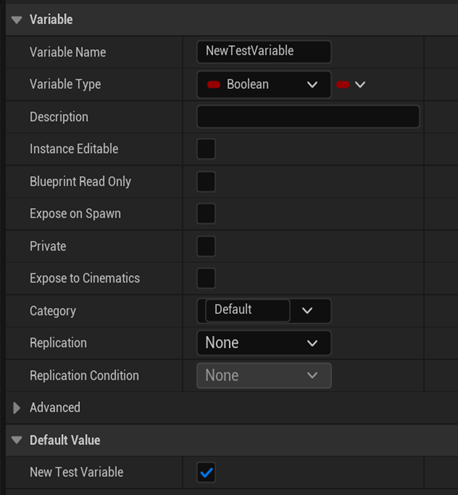
Let’s get back on course, the second change we will make is to add a new variable and drag its node onto the blueprint graph. I made a boolean variable with the name NewTestVariable and set its default value to true.
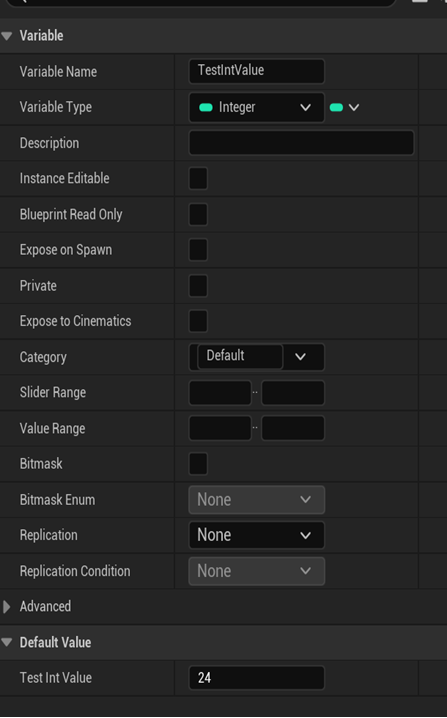
Once we make these changes, I’ll check in the ThirdPersonCharacter blueprint. Once that’s checked in let’s move to our second machine. On this machine we are going to pretend that we just didn’t check in the ThirdPersonCharacter blueprint and also work on that same blueprint. This time around I’m feeling like I want my character to be as light as a feather, so I’ll set its gravity to 1.25 and drag an Int variable onto the graph this time.
The Check In
Now that I’m satisfied with my changes I’ll check in my work. Upon trying to submit my changes, the Editor is telling me that there is an issue with my ThirdPersonCharacter blueprint. Let’s go hover the asset and see what’s going on.
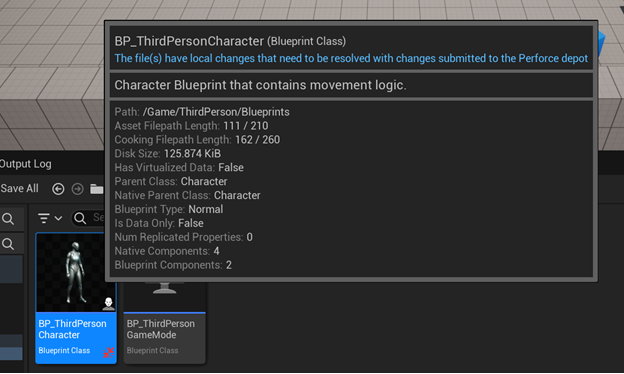
Apparently, my changes need to be resolved in order for me to check in my code.
Resolving the Conflict
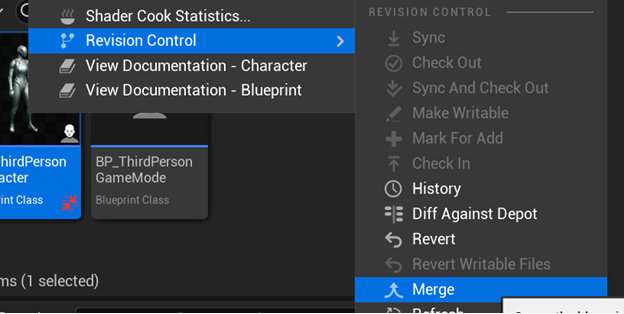
To start the merge process, I need to right click the asset, click Revision Control and then click Merge.
Once I click merge, I’m presented with a new window. This window has 3 columns, Target, Source and Base. Let’s dive a bit deeper into each one.
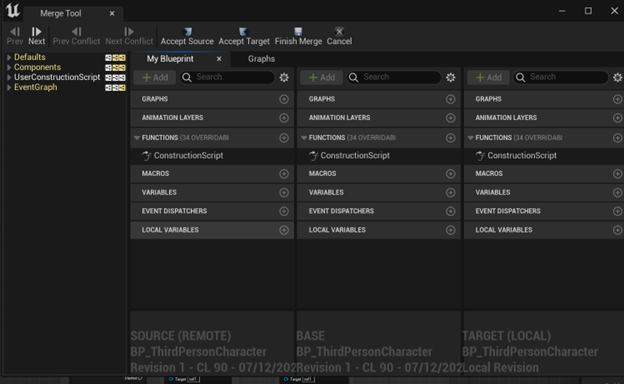
The Base is what the file currently looks like. We will walk through stepping through changes in a bit, when we do agree upon a change it is applied to base column so we can see what the final file will look like.
The Target column is our local copy of the file. In our case this will be the ThirdPersonCharacter blueprint with the gravity set to 1.25 and the new Int variable. This serves as a nice comparison into how our changes differ from the source branch.
The Source column is the remote copy of the file. Usually, you would consider this to be the “source of truth” in a sense. With a solid established workflow, the source should always be stable and altering it introduces opportunities for instability. On top of that, you don’t want to introduce bugs into your blueprints from an improper merge.
We have 3 options to complete a merge. The first is to Accept Source which will discard all of the changes you made locally in favor of the source changes. Usually, you never want to do this since you will just lose your work. This option works best for files that you may have accidentally opened and saved. For example, opening a blueprint and accidentally moving a node could cause a conflict, in this case you would want to discard your changes and accept the source since you did not mean to change that file.
The next option is to Accept Target. If we opt to accept the target changes (our local changes) it will overwrite whatever is currently in the repo. Usually, you don’t want to do this since you will be overwriting someone else’s work. An example of when you might want to use accept target is if you were updating an image or audio asset.
Now for the final option, Walk through the changes. Technically this isn’t a listed option in the UI, more so just a name for the series of steps you will be doing to merge both files successfully. On the top left of the window that popped up, there will be a Prev and Next button. You can view every change 1 by 1 and accept either the change on the source, local or override it in the base section to something else.

This process will usually rely on working with your teammates to swiftly merge in changes without anyone losing work. For example, the source has the Gravity Scale set to 1.75 while the target has the source set to 1.25. We have 2 conflicting values here and they can’t be merged. The Gravity Scale will either need to be 1.75 or 1.25.
In this example I would send a message to my teammate asking why he changed the value and then explaining to him why I changed it. After a few minutes we decided to set it back to its default value (1.50) and create a new discussion on what the Gravity Scale should be in the future.
The new conflict is the blueprint graph itself. We added 2 new variables and added them to the graph. This one is slightly more complicated in the sense that the built in merge tool in the Editor can’t tell us what nodes changed, it will however show us both graphs so we can check them both at the same time to see what changed. In our example the graph conflict is minor, neither of our new variables introduced any conflicting knowledge so we can use the Base section to add them both back to the graph.
Wrapping Up
To finish the merge, hit Finish Merge. Once we are done the window will close and then we can check in our changes.
Hold on, what about Git?
Currently the built-in Git plugin for the Editor is still in beta. I only use Git while I’m developing plugins and from what I’ve seen, the only missing features when compared to Perforce is the file locking which Git LFS does support. I will go into detail more about file locks in the Tips and Tricks section below.
The process in Git is the same exact process that was outlined previously for Perforce. I will note that I experienced 1 bug and 1 performance issue while trying to replicate our Perforce scenario.
The bug I encountered had to do with the Editor not picking up the most recent version of the file when I switched branches. To get the most recent files when I swapped branches I had to restart the Editor. The performance issue was just the speed of Git LFS. Git LFS does not play well with larger files and is not as performant as Perforce is when handling pulling/pushing of said files.
Tips and Tricks
You might be thinking, wow this was a pain! There are some ways that this can be avoided. I’ll wrap this post up with some common ways to prevent conflicts before they happen.
Check in often!
Checking your code in often leaves less work to be merged in the event that there is a conflict. Having to merge in 1 days’ worth of work is a lot less daunting of a task than attempting to merge in 2 weeks.
Utilize file locks!
Perforce gives you the option to check out a file which will put a lock on the file server side. Locked files can still be checked out by other team members, they’ll just get a warning that it’s already been checked out. Usually if you need to work on a locked file, you will contact the person who currently has the file checked out.
One important thing to note, locks only work for people working in the same branch. If one person is working on the ThirdPersonCharacter blueprint in the branch feature/new-armor and another person is working on the same blueprint in feature/swimming, you won’t get notified that the file is locked out and you will both have to do a merge when both branches get merged into your main branch.
Git also has file locks when using Git LFS (which you should be using if you want to use Git for binary files).
Use Components
I’ll say it again for the people in the back, components, components and dare I say it again… components! A good workflow to have is to create all your logic in reusable components that can then be attached to the blueprints themselves.
Using the example from the file locks above, if Eric was working on a new armor mechanic and he put all his work in a component and Jasmine put her new swimming mechanic into one as well, once these 2 branches needed to merge, they will just see that the only conflict will be that a component was added to the blueprint.
This makes merging infinitely easier as well as making your code more portable.
Utilize one file per actor!
New to Unreal Engine 5 is the one file per actor feature. This feature comes in handy when working on levels. One file per actor will make little caches of your primary blueprint for each level that it is in to prevent the main file from having to be checked out.
This is a huge boon that will allow multiple levels to be worked on at the same time. Prior to this feature, you may have run into collisions if multiple people were working on separate levels that utilized the same set of assets.
Coordination
If you know that you’re planning on revamping the animation blueprint for your project, let your team members know in advance so no one else will try to alter that file until you’re done.
Conclusion
Regardless of what source control system your team uses with Unreal Engine, your team will run into merge conflicts. This post walks through how to handle those conflicts and let’s face it, merging uasset files can be a pain when your blueprints start to get more complex in terms of logic and size.
Utilizing the tips and tricks section of this post will help reduce the occurrences of merges drastically which will overall increase your team’s speed when it comes to integrating new features and functionality into your Unreal Engine project’s main branch.
Diversion
We walked through an example of resolving a merge conflict with Git and Perforce.
There is a new SCM tool on the block named Diversion which you might want to follow more closely.
Diversion provides a cloud-native solution with the promise to make life easier for game developers. When it comes down to handling merge conflicts, Diversion is working on a native way to notify team members when someone else is working on a file that you are working on. This feature works similarly to using file locks as we discussed above with the major difference being that this is all handled automatically by Diversion. No more remembering to check out uassets!
This is a guest post by Edward Beazer. Edward (in his own words) is a software engineer who likes to focus on Flutter, Go, DevOps, Unreal Engine and game development. When he’s not working on a project you can catch him checking out local breweries or managing his 750 liter fish tank


