Getting Started with Diversion and Unreal Engine 5

Edward Beazer

One of the most frequent questions that I hear in the gaming industry is what source control system should I use for my upcoming project?  

With Git your team can utilize a skillset that they already have and will not have to learn anything new to commit, review, and release their code. The big disadvantage is Git LFS’s speed with large binary files, teaching artists how to use LFS, as well as storage limitations on some of the most popular Git hosts. An example is GitHub only offering 1GB of storage before having to start expanding. For reference, Unreal Engine 5’s default Third Person template takes up 500MB without any modifications.  As for artists, if you do not know what you are doing you can easily push commits that look okay on Git’s end while not correctly pushing the LFS files associated with your commit. We will dive deeper into LFS in the Syncing Files section.

After the performance talk in regard to Git, Perforce becomes the next suggestion. Impressive performance, yet it feels like you have to sacrifice everything for that performance. The biggest example is that Perforce is a hosted solution which means you will need to have team members who are knowledgeable about Perforce to keep the service running, secured, and backed up. In addition to that large requirement, you also have to deal with the subpar client. As of the date of this article, Assembla is the only hosted Perforce service available and it is primarily aimed at enterprise users.

Instead of having two options that are not ideal for most teams, we now have a third! Diversion gives us the best of both systems. You will get a CLI and a workflow that works almost identically to Git, a fully functional intuitive UI capable of performing actions such as branching and committing as well as being able to keep that lovely performance that we see when using Perforce!

Setup  

If you have been reading any of my articles, then you know I love to work with the Third Person template for Unreal Engine. It is simple, has a small size and everyone who uses the engine usually starts with this template and is familiar with it.

Let us start off being downloading the Diversion CLI. One important item to note, this download page walks you through setting up your first repository. If you do end up creating your test repo here, then you can skip the next few steps.

Once you download the CLI we are going to want to sign in and create a new repository.

dv login  
mkdir test-project # this directory will be the name of your repository.
cd test-project
dv init . # Create a new repository in the current directory. This command will use the parent folder as the repo name.

Just like that we have a new repository. The web console has a similar workflow, if you created your repo in the console use this command to initialize it on your local computer.

dv clone PROJECT_NAME
cd PROJECT_NAME

One important thing I want to note for those of us coming from Git, this is a 1 to 1 process. The commands you would utilize to init and clone repos in Git are the exact same for Diversion which translates to you not having to learn an entirely new tool and sacrifice productivity and time while learning Diversion.

Syncing Files

Now that we have our repository cloned onto our local machine, we are going to want to synchronize some files. If you are not familiar with Perforce, syncing files may seem like a foreign concept. Synchronizing files is a process where your local workspace uploads all of your changed files to the server.

With both Git LFS and Perforce, when you want to make a commit (change list for Perforce) the client will synchronize all the files in your staged list. Once that sync is completed you will then be able to make a formal commit or change list. Usually, this process is done in a single step, so the commit is automatic once the sync has completed successfully.

Diversion takes file syncing to the next level. Unlike Git and Perforce, Diversion is cloud native. While adding, modifying, and deleting files, Diversion is constantly synchronizing the changes to the cloud in the background.  

You might ask, why does this matter? Well, there are a few advantages to having this constant sync. The first one is that we significantly reduce the time we wait for our commits to be pushed to the server. Imagine if you edited a few textures and art files and ended up with a 10GB commit you needed to upload. When it comes time to do your commit you will need to wait for that entire upload to finish before you can formally make a commit.  

With Diversion, that upload happens in the background the moment you change a file. When you are ready to commit you could find yourself in a nice situation where all of your changes have already synchronized to the cloud, so you do not have to wait for any uploading.

The next advantage to this real-time sync is the ability to notify you of potential conflicts before either party even commits their files to the branch! Since all of our files exist in the cloud the server can constantly reconcile the differences and notifies the relevant users whenever a conflict may arise. I plan to write more about this in a future article so stay tuned!

Adding Content

Now that we have gotten some of the technical behind-the-scenes magic out of the way let us continue with adding our files to our new repository.
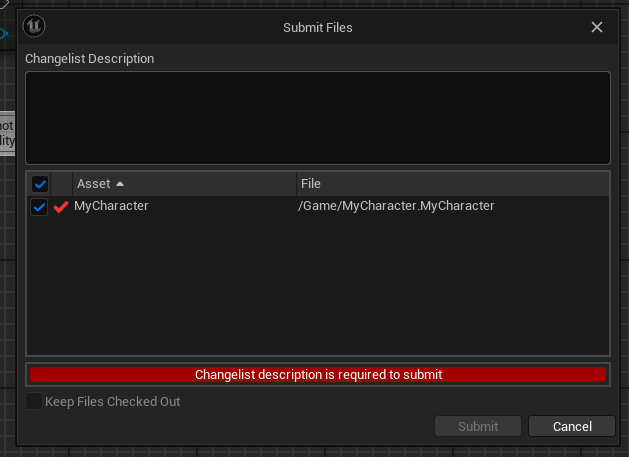
 Open Unreal Engine and create a new project using the Third Person template. Make sure to choose our new repository as the directory for the project.

Once you create the project go back to your terminal and type in the following.

dv status

You will notice that your files are now synchronizing to the cloud. The status command gives you a quick snapshot of your current workspace and branch. If files are synchronizing to or from the cloud you will see an update of the number of files left as well as the remaining file size.

Let us make a commit since we just added a lot of files. Notice how the following command is the same as it is for git.

dv commit -a

Your terminal will ask you for a commit message and once you enter it you can double tap enter to finalize your commit.

Branching

Diversion uses a branching system that is similar to git except that instead of having local branches Diversion has workspaces. Before we dive into the CLI usage with branching let us talk about workspaces.

With Diversion you typically will not work directly off a branch. Instead, you will work off your own private copy of the branch in the form of a workspace. This is similar to how Git has local and remote branches. The main difference here is that we need workspaces due to the fact we are not using a decentralized system like Git.  

When you clone a Git repository, all of the history is synchronized onto your local machine. Every time you update the repo, every change is synchronized back. With centralized systems like Diversion and Perforce, the server has all of the information while the clients only have what they need/requested. Workspaces are a way for the server to keep that relationship to a branch for us.

Now that we got that out of the way let us start branching!

dv branch -c move-speed

Let us explore the console a bit with this change. We will make a simple change to our character by increasing their move speed.

Open the BP_ThirdPersonCharacter file inside of the Blueprints folder and click on the Character Movement Component

A screenshot of a computerDescription automatically generated

We want to scroll down to the Character Movement: Walking section in the details panel and change the Max Walk Speed value. Just for fun I set my value to 2000 which should have my character moving at lightning speeds!

Instead of committing through the CLI, let us try using the console.  

dv view

This command will open up your workspace in the web console. Upon opening you will see something very cool. All of your files that you changed will be here as well as a nice area for you to make a commit without having to use the CLI.

A screenshot of a chatDescription automatically generated

We want to commit the file we just edited. In that view click the BP_ThirdPersonCharacter.uasset checkbox, type a commit message and hit commit. The layout may be different from GitHub or Gitlab, do notice how the workflows for all of the common tasks we end up doing with Diversion are identical to git providers leaving us with a drop-in replacement.

Let us merge our increased movement speed change now.  

dv checkout main # swap to our main branch
dv merge move-speed # merges the move-speed branch into main

If there are not any conflicts, we should be able to smoothly merge our move speed change into our main branch.  

Wrapping Up

We just touched base on a few of the commands available to us with the Diversion CLI.  Whether you are coming from Git or from Perforce Diversion offers a seamless experience when compared to other source control systems as well as offering fast upload speeds and drop in workflows

Tips

Use the help command

If at any point you were unfamiliar with the commands for the CLI if you just type dv an interactive client will run that will walk you through the commands utilizing your actual account info (ex. If can prefill your repository names when you type dv clone)

Utilize the interactive CLI

If you are new to CLI’s or just want to explore all of the commands just type in dv.  You will get the interactive client.  

A screenshot of a computer screenDescription automatically generated

Make a habit of checking the web console

Diversion is a cloud native source control system; this means that everyone’s modified files are synchronized to the cloud even if they have not committed their changes yet. This gives us the unique ability to see if we have any conflicts without checking the base branch. If you make a habit of checking the web console daily, you can get ahead of any potential conflicts before you get too deep into your changes. (There is also a conflict notification feature that is coming soon).

Share your workspaces

Soon you will be able to directly share your workspaces. If you want a team member to check out your work, you can easily give them access to a read-only or read-write copy of your workspace using the following command. This will allow you to get feedback or review comments prior to committing your work to the project.

dv share <user> [--rw]

Share Us