
Avoid merge conflicts by using a multi-scene workflow in Unity!
Like many other game engines, Unity is known for continuously expanding, and it has evolved drastically over the years. While some updates were about bug fixes, optimisation or discrete editor tooling, there’s also been a few notable releases that introduced game-changing features. In particular, Unity 5, which was published in 2015, brought a lot to the Unity community.
Among which, of course, an amazing feature that revolutionised the workflow of many Unity game developers: the multi-scene editing.
So, today, let’s explore what multi-scene editing is exactly and why it is so interesting, with a special focus on how great it can be for collaborative teamwork.
What are multi-scenes?
As the name implies, multi-scene editing is about using multiple scenes at the same time. More precisely, the idea is to stack one or more Unity Scene assets in the hierarchy, and thus get a complete set piece that is the sum of each of these separate hierarchies.
Studying a simple example
Alright - to understand what we’re dealing with, let’s start with a basic example.
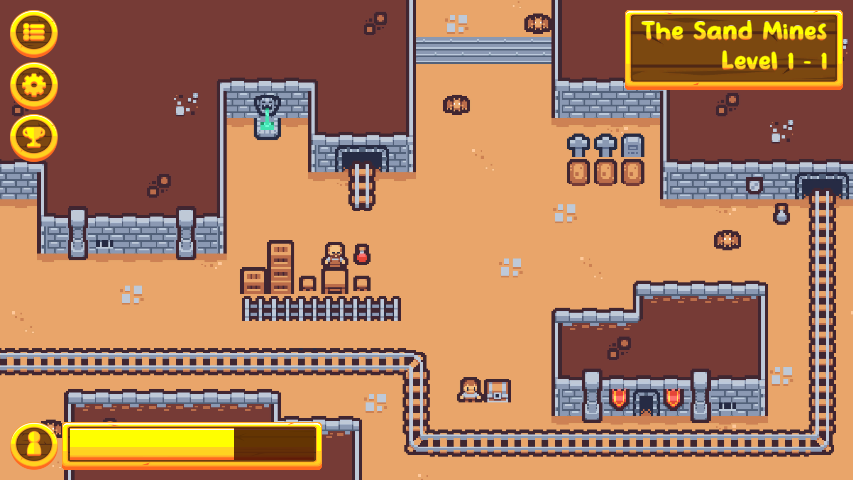
Let’s say you’re working on this simple level for your next RPG game, and you’re a level designer partnered up with a UI artist. Your goal is to set up the environment by filling in the tilemap, while your teammate is preparing the interface.
In the end, if all goes well, you should get something resembling this:
Now, a naive approach to this mission would be to simply create a new Unity Scene asset in the project, and then have your UI designer work on a Canvas UI hierarchy, while you’re making a nice map of sprites.
The problem is that if both of you split up, work on their own thing, and then regroup to re-assemble the level, you’ll each have half of a scene that is completely out-of-date and meaningless. (The UI designer will have the empty tilemap prototype, and you’ll be left with a blank Canvas.)
Here, using multi-scene editing is a cool way to avoid this issue and get a better workflow for the team. For example, we could separate the level from the UI and prepare two scenes, like so:
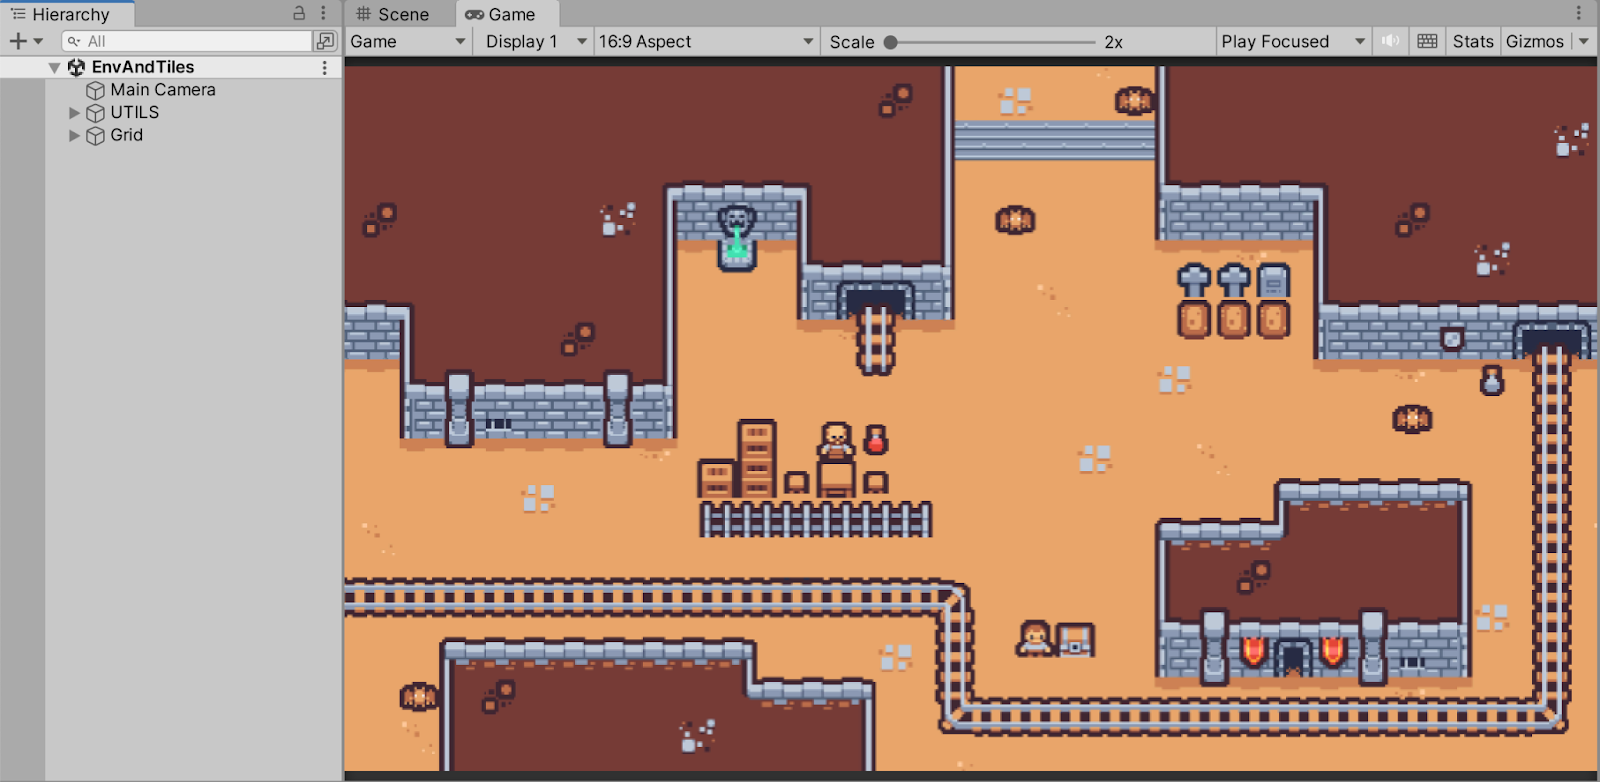
- The “EnvAndTiles” scene, that contains the tilemap and environment assets:
- The “UI” scene, that contains the various buttons and info labels:
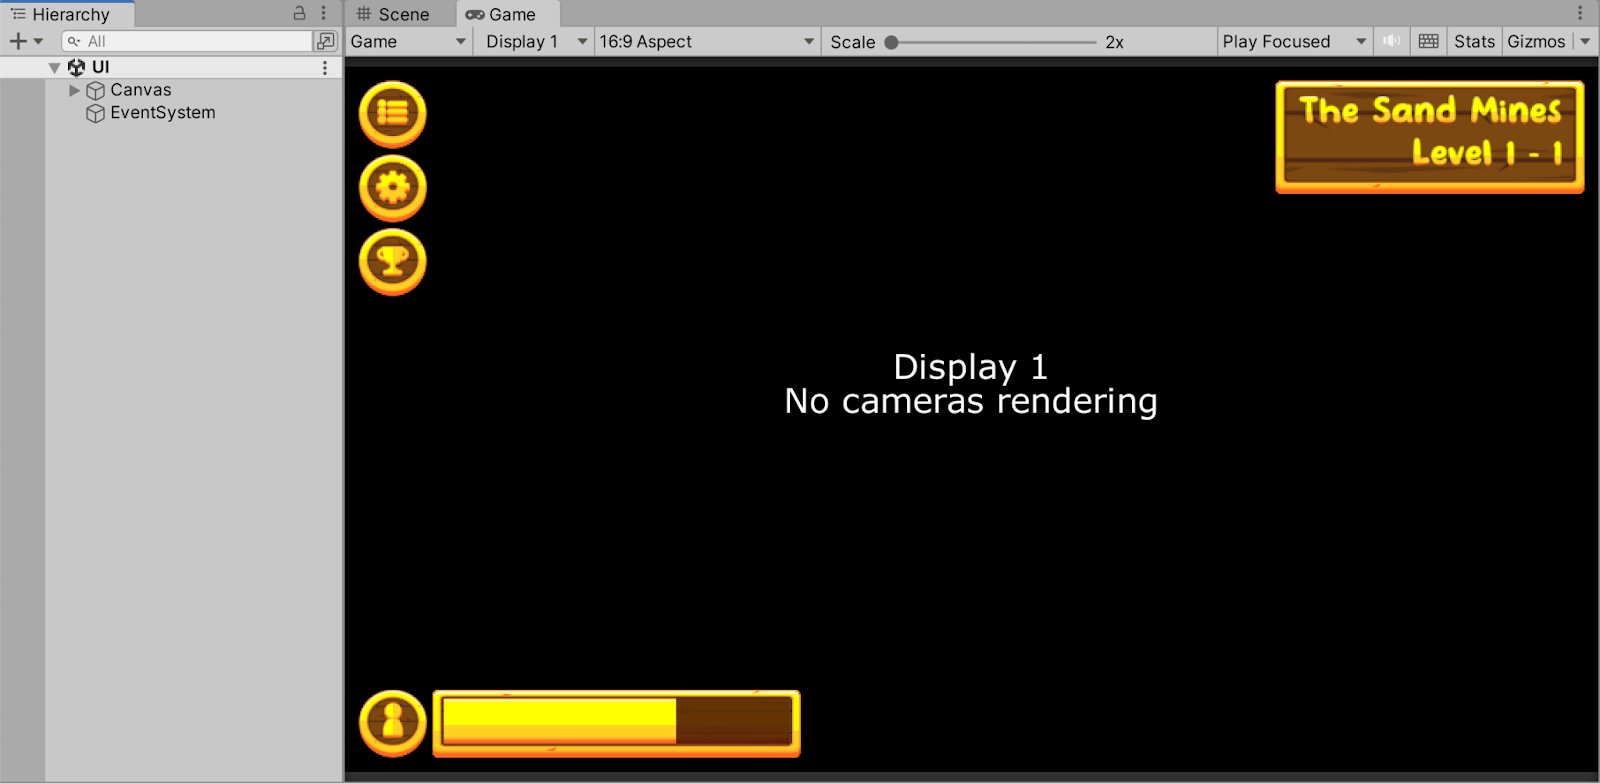
And then, we’d just have to stack both those scenes together to re-create the final level (you’ll notice in the Hierarchy panel on the left that we indeed have two scenes loaded up, that each contain the hierarchies we prepared before):

Although it’s a basic example, this two-scenes system already hints at the power of multi-scene editing. And the best part is that it’s quite easy to use!
Using multi-scenes
To achieve multi-scene editing in your project, you can load and stack up multiple scenes either in edit mode or at runtime. More precisely :
- In the editor, you simply have to drag a Scene asset from the Project dock to the Hierarchy to load up the hierarchy on top of the previous one(s). Double-clicking on the asset will open this scene in solo, and remove the previously loaded hierarchies.
- In your scripts, you can use the SceneManager API to find, load or unload scenes in your project. For performance reasons, we mostly use the LoadSceneAsync() and UnloadSceneAsync() functions to update our multi-scene hierarchy asynchronously. Although the default load behaviour is to replace the previous hierarchies and load scenes in single mode, we can easily stack multiple scenes by using the LoadSceneMode.Additive option.
Something interesting is that manipulating scenes in no way depends on how they are structured; in other words, it’s totally possible to write one scene management script in a project, and then re-use it over and over again in all the following ones :)
A few caveats
While this system is very powerful, it also has a few limitations that you need to keep in mind before refactoring your entire game.
For example, this feature doesn’t allow you to do cross-scene references. This means that, if you have a GameObject in Scene A, you cannot drag it to the inspector of a script in Scene B. This is important because it may have an impact on how you separate your scenes into multiple chunks.
Also, because you usually load your scenes asynchronously when using the new SceneManager API, you have to be careful how you code your initialisation logic, so that it executes once all the required components have been loaded.
A common pitfall is also to forget that some scene settings, like lighting, occlusion culling or NavMesh data, are scene-specific. That’s why if you try to be sneaky like me and put your global directional light and camera in a different scene than the actual level geometry to keep the same viewpoint throughout the whole game… you’ll quickly find yourself in pitch black scenes! Of course, baking the light solves this issue, but it constrains the process a bit.
Still, using a multi-scene workflow can definitely up your game if you do it well - let’s see why in more detail.
The power of multi-scene workflows
Using multi-scenes has many advantages for game creators; from cleaning up your project to handling large levels and improving your team workflow, this tool is definitely worth taking a look at.
Chopping down large scenes
Have you ever had that heartbreaking moment where you realise that your not-so-fancy organisation doesn’t really hold up, now that the project has scaled up? Have you ever pieced together some core game features during a game jam, only to discover that the whole thing nears the breaking point if you try to add one more idea?
Creating games is hard. It is not simply a challenging task, it’s actually a series of challenging tasks that have to be anticipated, designed and completed in the right order. Plus, it requires you to mix a lot of areas of expertise - be it 2D art, 3D modelling, scripting, level design, story and dialogue writing…
The worst part is that this complexity also transpires in the project itself. As your game grows, your levels will start to fill with an uncontrollable number of props, and your developers will start to crumble under the number of scripts to maintain.
In Unity, this often translates to heavy scenes with a big amount of GameObjects. And although there are a few tricks for organising this mass of objects, ultimately, it becomes cumbersome for everyone to browse, update and build.
But of course, you guessed it - this is where multi-scene editing shines!
Because, thanks to multi-scene editing, it is possible to separate this unmanageable whole into smaller pieces that are each of a reasonable size, and handle the re-assembling in parallel. There is no “best way” to cut down your scenes: some teams prefer to separate by locations (like the different floors of a big house), while others prefer to separate by layers (like the base building versus the props), or even by roles (like the scenery versus the logic).
But in any case: dividing your large levels into multiple Unity scenes and then loading them to reconstruct the entire set piece while the game runs can help you better focus on each part, and improve your project’s maintainability.
Making cross-scene data holders
Another nice application of multi-scene editing is for data, and more particularly for global game data at the session-level.
Suppose you have an audio manager script that should be loaded when the game first starts, and then is used throughout all the levels to play music or sounds. In that case, destroying and re-creating this manager every time we load a new level seems a bit silly; it would be better to just make our instance at the beginning, and then stick with it. (Actually, it’s also inefficient, because constantly de-allocating and re-allocating memory can cause memory fragmentation and displease your computer.)
Longtime Unity users have a quick solution to this issue: the DontDestroyOnLoad method, which can be added to any MonoBehaviour script on an object to prevent it from being destroyed when the scene is unloaded.
However, this technique has a few downsides, like being only applicable to root GameObjects in the scene. This imposes a specific scene hierarchy that might collide with your organisation ideals and weigh on the readability of the level’s tree.
Once again, here, multi-scene editing is a neat substitute, since you can keep a scene loaded in the background with the session-wide objects and components (typically, a data holder with global game data). For example, this background scene could contain our aforementioned audio manager script and keep it alive throughout the entire game without ever having to de-allocate and re-allocate memory for it.
Re-thinking collaborative Unity game creation
Last but not least, a big use case of multi-scene editing is for collaborative work.
Indeed, by splitting your scenes in a smart way, you can effectively have the project organisation follow your team organisation, and use this feature to divide your tasks and avoid asset conflicts.
But you know what? This actually deserves its own section. So let’s go ahead and dive in deeper into why multi-scene editing can completely reinvent collaborative game creation in Unity.
A good case study: avoiding merge conflicts!
It is no secret that, from a technical point of view, managing a game project is no small feat. Compared to web apps or Python scripts, which are virtually only code files, games mix up both text (with the game code) and assets such as images, movies or 3D models (which are usually binary or specifically formatted files).
This is why versioning a Unity project with Git is hard, and why merge conflicts are almost always a pain in game development.
Luckily, multi-scenes can help with that :)
Leveraging multi-scene editing for versioning
One of the key reasons why versioning game projects is difficult is because we tend to cram everything together. Oftentimes, Unity Scene assets are global containers that are thought of as entire levels; it’s where you put all your environment 3D models, and your characters, and your UI, and your scripting logic.
Of course, I’m not saying it is bad per se. If this workflow works for you and your team, then that’s great!
However, from a versioning point of view, it clearly complicates things. ‘Cause with this simple organisation scheme, a UI designer working on the menu bar at the top of the screen will basically edit the same file as a developer coding the behaviour of doors - and so, even if those two features have nothing do with each other, the two teammates will experience a merge conflict when they both try to submit their work.
On the other hand, cutting down this level into multiple Unity Scene assets and relying on a multi-scene workflow can dodge this issue. Typically, here, we could have one scene for the environment that the dev edits to implement the door mechanic, and another scene with the UI that the designer updates with new layouts, elements or even images.
In my experience, this type of workflow is really enjoyable for artists and developers because it provides everyone with their own workspace, and it feels like you’re more in control - no chance of coming back to the scene on Monday and discovering someone else completely messed up the hierarchy!
However, there is still one problem at this point. Remember how, previously, we said that multi-scene prevents us from doing cross-scene references? This means that we will have to bring it all together at one point, since some tasks will necessarily depend on the final level being assembled. For example, it’s very likely that the buttons in the top menu bar of the UI scene need to have some callback logic, so developers or integrators will need to wire the scripts to the right elements once the scenes have been stacked together (perhaps even dynamically).
Which, despite our good practices, can still lead to some annoying conflicts.
But… what if we didn’t have to worry about this assembly step at all? What if everyone could work independently until the very end?
Going even further with event-based projects
If you really want to get crazy about multi-scene editing, then you might eventually grow to enjoy event-based logic, too. Because using events is a great way to completely decentralise logic, and remove dependencies.
Consider our previous example. What if, instead of leaving the UI buttons logic-less, you put a simple pre-made component on them that sends a “click” event with a unique button ID? Then a developer could write the callback function corresponding to this button in advance and say that it will trigger if this specific event is received.
This way, the UI designer and the developer can finish their tasks autonomously, and the Scene assets assembly simply becomes a step where you lay the work of the whole team side-by-side, and let the logic flow in this global context.
Pretty cool, right?
So - is it a perfect solution?
Ever since I’ve discovered it, multi-scene editing has been an essential part of my Unity game dev toolbox, and I usually shape a lot of my projects around this “background scene(s)” backbone.
Yet, this feature is not a silver-bullet.
Even though it does help with splitting the scenes, and dividing the work, and protecting the assets from changes made by other teammates, it cannot handle all situations. Especially because, in the end, levels still have to be re-assembled into a coherent whole, which means that you will have to join together the results of each member of your team… and hope it all fits as expected.
Moreover, multi-scenes are interesting for avoiding conflicts between developers and artists, or designers and integrators. But two developers assigned to a similar task will still probably need to edit the exact same files, and two artists collaborating on the same textures will still need to coordinate to add the right final file to Unity.
Therefore this tool, while it is definitely worth exploring for improving your game dev pipeline, isn’t a magic solution!
Preventing conflicts thanks to Diversion!
As discussed above, while using a modular architecture based on multi-scene can dramatically reduce the risk of conflicts, eventually developers, designers and artists might need to collaborate on a single file.
Working on such a file just to later find out that it was modified by your peer can be a frustrating experience… but what if it could be almost completely prevented?
Well, good news - it can :)
Diversion is a cloud-native SCM solution that allows all team members - developers, designers and artists - to use a single, simple-to-use version control system.
In particular, one key feature that we are developing to address the ever growing pains of collaboration for game projects is conflict-prevention.
The idea is simple: whenever a team member starts working on a file that somebody else is already working on, they get a notification that they might be creating a conflict, along with details on who’s working on the file and when it was last changed. This is made possible in Diversion because it continuously synchronises all your local changes to the cloud.
Diversion thus offers an interesting solution to the painful issue of losing your work because of merge conflicts, and you can even combine it with multi-scene to get the best of both worlds!
Conclusion
Collaboration across game development teams is a huge problem, and being able to address it is clearly key for a game company.
Unity’s multi-scene editing feature is a powerful tool that can help with collaborative development, and allow the different teammates to make progress in parallel in an organised way. Using it can thus dramatically improve the agility of your team.
But when it comes to version control, the ability to detect and avoid potential conflicts is yet another building block that can help you reduce frustration and increase development speed - and multi-scene editing cannot solve this problem.
Let’s conclude with the good news: Diversion is working on some great features for dealing with this issue, such as native conflict prevention.
At the moment, conflict prevention in Diversion is still under development - but since this feature is one of the most requested by game developers, it’s planned to be built very soon. If you find this useful, you can check out Diversion here.


